Hello and welcome to our series of technology-related blog posts helping you establish your very own piano studio website. In this post, we would like to give you a step by step instructions on how to create a free piano studio website on WordPress.com.
Why WordPress.com?
These days everybody knows about the WordPress platform. According to 2018 usage stats from w3tech.com, the WordPress platform is used on 33.7% of all the sites on the Internet which is 60.7% of the market share. WordPress platform is the number one choice when it comes to content management systems. And WordPress.com is powered by WordPress and has a free plan for you. But since nothing is free you pay by rendering their ads on your website instead. If you are not comfortable with their ads then go with one of their paid plans. They have more features including a free primary domain of your choice.
Onboarding
Start by navigating to https://wordpress.com/free/. Once on the page follow the appropriate button to create your website. To make this tutorial more realistic we are going to create a website for ABC Piano Studio together with you.
Step 1
How would you like to name your site? If you already have the name e.g. ABC Piano Studio just type it in and if you haven’t decided yet then this post will give you an idea of what should be in the name John, is it you? Or how do you name your piano studio?

Step 2
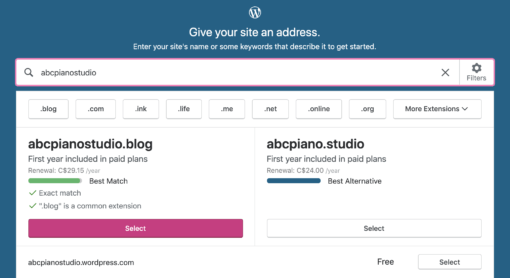
This step is about the domain name for your piano studio website. We talked about the domain name in Is it my cow or your’s? Or why do you want a domain name for your piano studio? Have you purchased one yet? If not we highly recommend you do so as with a little investment in the unique domain name you put your website ahead of the game.
Step 3
And now the final step in the onboarding process is the selection of the plan that’s right for you. Feel free to choose from the lineup, but since this tutorial is about a free website we are picking a Free plan with minimum benefits and a sub-domain linked to wordpress.com.

Site Checklist
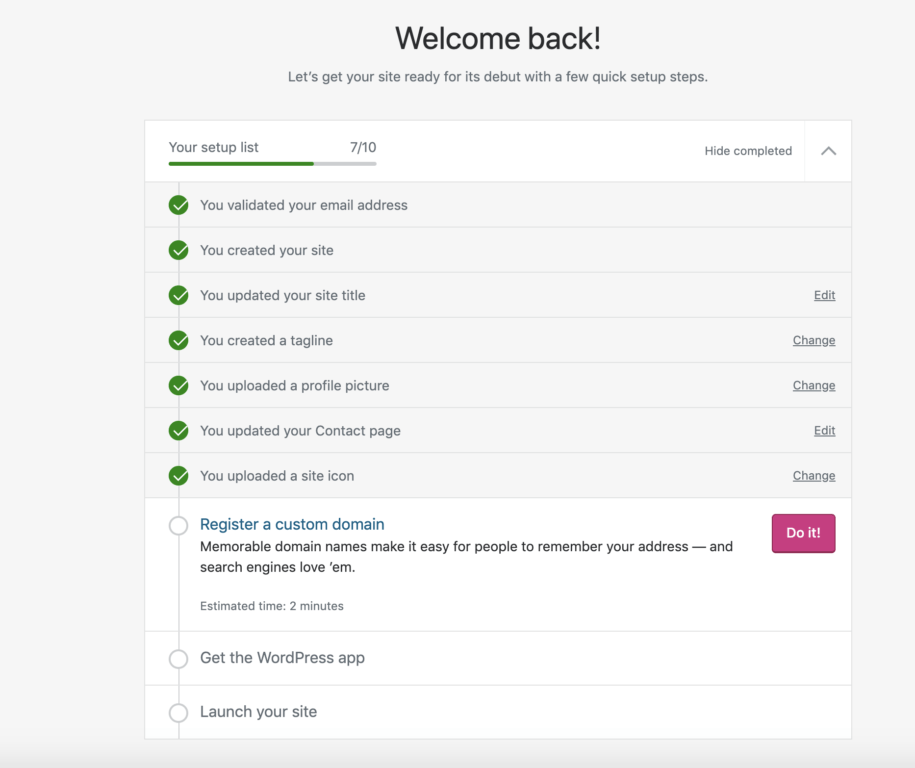
Congratulations, your site has been created! Your next step is going through the site checklist. WordPress.com made it extremely easy for you to fill in all the required data. A guided approach helps to keep you focused on things that matter the most for SEO and your visitors. Click Do It! for each item on the list and follow the instructions to fill in the gaps. The checklist for ABC Piano Studio looked like this in the end.
Main Menu
Continue by exploring the main menu on the left, check out some of the sections and see what you can do. The names of the menu items are self-explanatory.
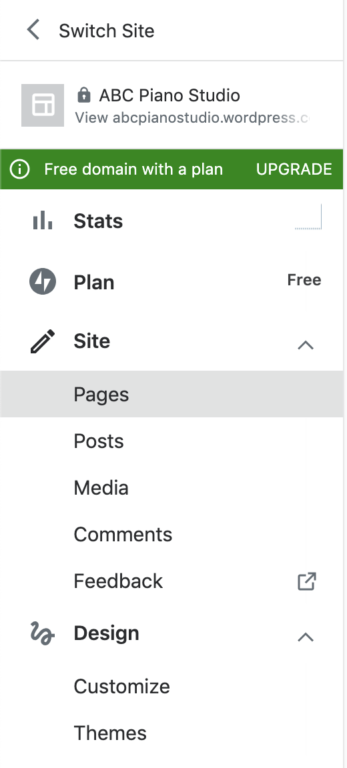
You can access your Pages, Posts and Media library from here. Customize your current theme or select a completely different one. Moderate Comments and read the Feedback. Let’s pick a different theme! I picked a free theme with the name Radcliffe 2 for ABC Piano Studio.
Themes
You can access themes by navigating to the Design / Themes. When it comes to the variety of Free themes on WordPress.com you have of course much fewer options than you do with the paid plan or self-hosted WordPress. However, thanks to the power of WordPress you have enough freedom to make your piano studio website appealing to visitors anyway. With the help of Design / Customize!
Customize

This section of WordPress allows you to do what is called WYSIWYG. A WYSIWYG (pronounced “wiz-ee-wig”) editor or program is one that allows you to see what the end result will look like while the website is being modified. WYSIWYG is an acronym for “what you see is what you get”.
All the themes allow customizations of Fonts and Colors. Start there and gradually explore what else you can do. You will be surprised how much different the basic theme will look in the end. Customize away until you are happy with what you see! It is your piano studio after all.
Content
We have already talked about the basics of the Web in the blog post about the omelette. Read it again to have a better idea of what purpose the Pages are serving. Consider creating a simple information architecture of your website on a napkin too! Create a few pages, to begin with. Give them a clear and simple one-word title. I have created Home, About, Testimonials, Studio and Contact.
Origin story
The reason you are teaching piano is very important to your students and their parents. The more passion you show in your story the more trust you will get from the get-go. The story will go to the About or Philosophy page.
Launch site
Unbelievable it may sound you are now ready to launch your website to the public. WordPress.com makes it easy for you as all you need is to push the button Launch site at the top right corner. Once clicked you start the final 3 step process of bringing your website online. Step 1 is to pick the domain once more. For the Free website click the Skip Purchase link at the bottom.

Step 2 is to confirm your plan and we are considering Start for Free for the Free website. If in the process you have changed your mind pick a paid plan from the lineup.

Step 3 is GO! Easy? Of course. It was easy. ABC Piano Studio launched with you too at https://abcpianostudio.wordpress.com/. I hope the tutorial was easy enough to follow and you now have a website for your piano studio. If you are looking for more help leave your comment down below and I will come back to you with the answer shortly.
